
11. May 2023
Integrating QF-Test with TeamCity in three easy steps
QF-Test can be easily integrated with common CI tools like Jenkins and TeamCity.
In fact, a QF-Test plug-in for Jenkins is available out-of-the-box which makes things pretty easy but even with other CI tools, an integration is possible with just a few steps.
In this blog post, I will demonstrate these steps for TeamCity CI.
Important note: CI tools often suggest using a headless service for the agent process. However, for GUI testing it is crucial to use a real user session to ensure that the desktop environment behaves as expected. This may not be the case if a CI agent is running as a service. That’s why we recommend starting the agent in a real user session. Refer to the Integration with Development Tools chapter of our user manual for additional information.
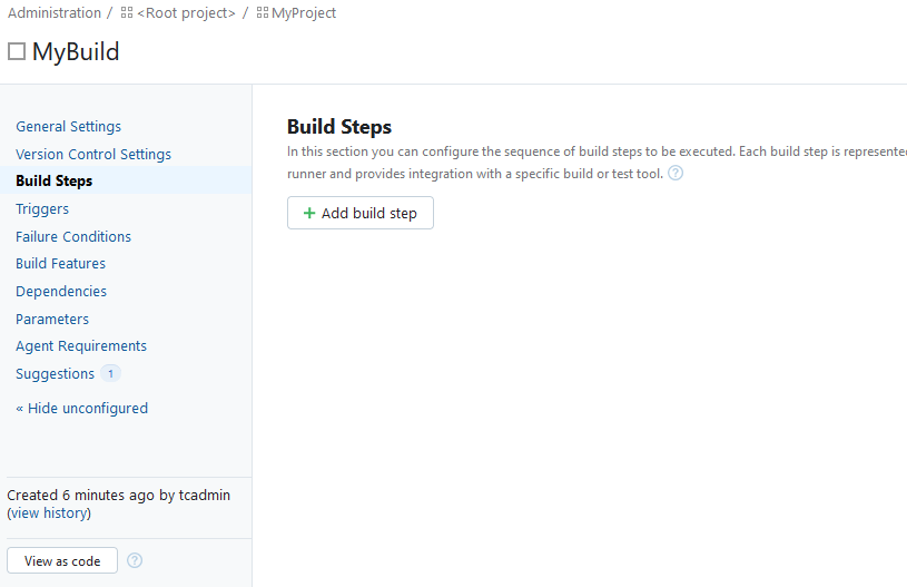
Step 1: Command Line Execution Build Step
Note: You need to have a project with a build configuration ready to go.
Central element for integrating QF-Test with TeamCity is the “execution” build step. QF-Test provides an extensive command line interface which is documented in the reference manual.
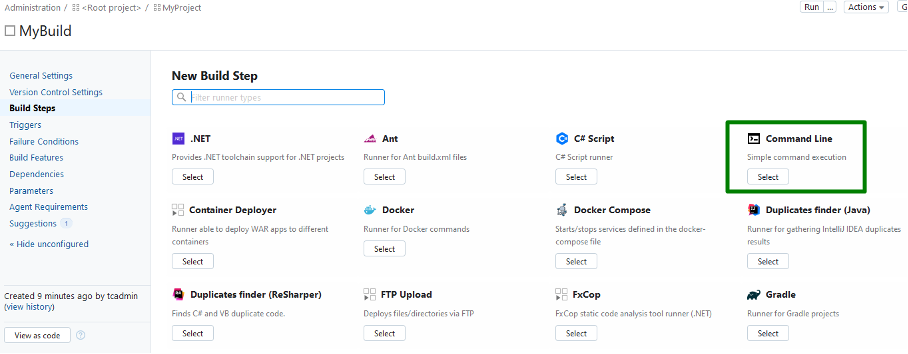
In TeamCity, add a new build step …
… and select a “Command Line” build step.
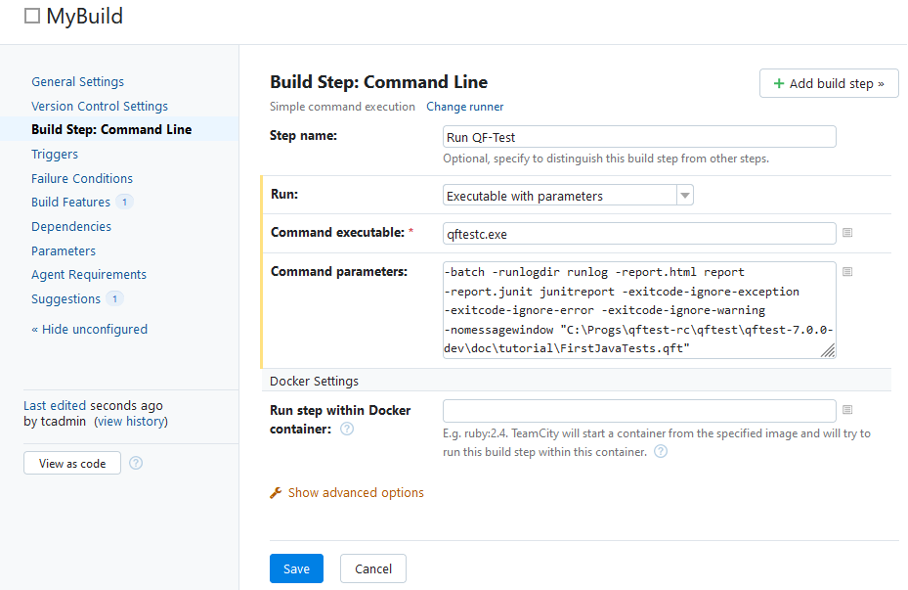
There,
- define an appropriate step name
- select „Executable with parameter“
- set “qftestc.exe” as “Command executable” (qftestc.exe is a version of qftest.exe which is optimized for command line usage)
- define the following parameters:
-batch -report.html report
-report.junit junitreport
-exitcode-ignore-exception -exitcode-ignore-error -exitcode-ignore-warning
-nomessagewindow
"<Full path to the test suite to be executed>"
Here is a quick explanation of the used command line parameters:
-batch: we want to run QF-Test in batch mode without QF-Test UI-runlogdir runlog: run logs should be put into a dedicated sub-directory-report.html report: we want to create an HTML report which we will integrate into TeamCity later-report.junit junitreport: an additional report in JUnit format allows TeamCity to parse the test results properly-exitcode-ignore-exception -exitcode-ignore-error -exitcode-ignore-warning: don’t return a non-zero exit code on test errors, since they would be interpreted as hard crashes by TeamCity-nomessagewindow: Don’t display any error message windows, print everything to standard output instead
So, now we have completed the first step and can start a first test run before creating the next configuration.
Note: You need to have at least one TeamCity agent available. As a prerequisite, QF-Test must be installed on the host of the agent.
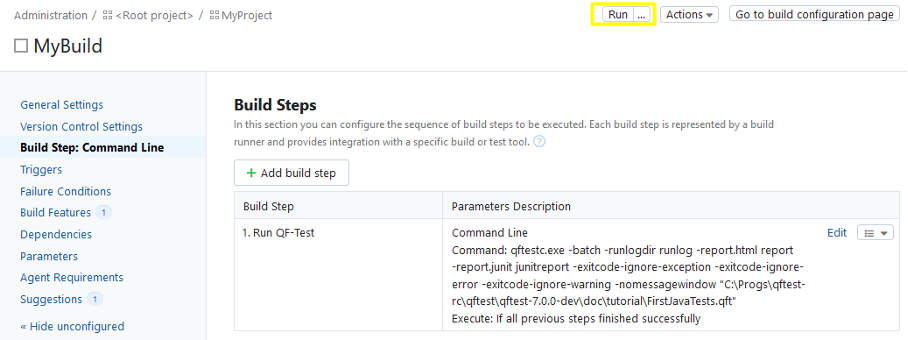
We can switch to the “build configuration page” to see the build result.

Here we should see the results of our first test run, hopefully with status “Success”.
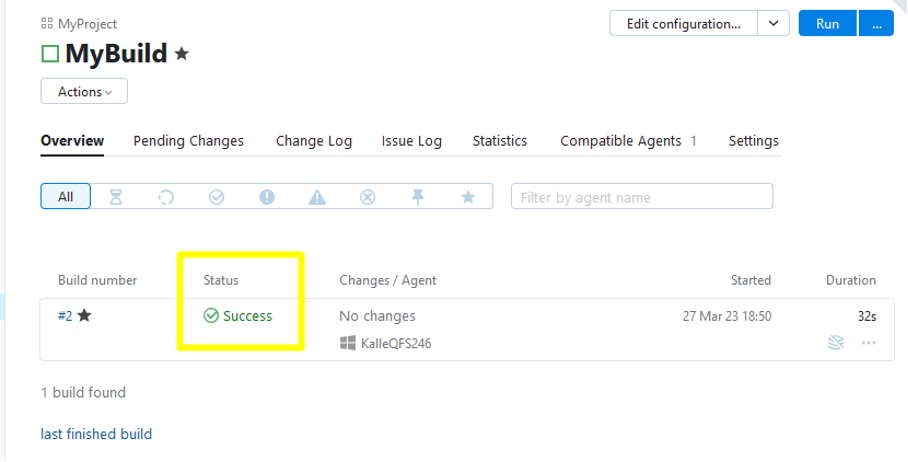
That’s great but “Success” just means that the QF-Test process has returned a 0 exit code on the command line, but there is no information about actually successful of failed test cases.
Step 2: Test result reporting
To achieve this, we will use the JUnit reports which have been generated by QF-Test. Those contain the information about successful and failed test cases that can be interpreted by TeamCity.
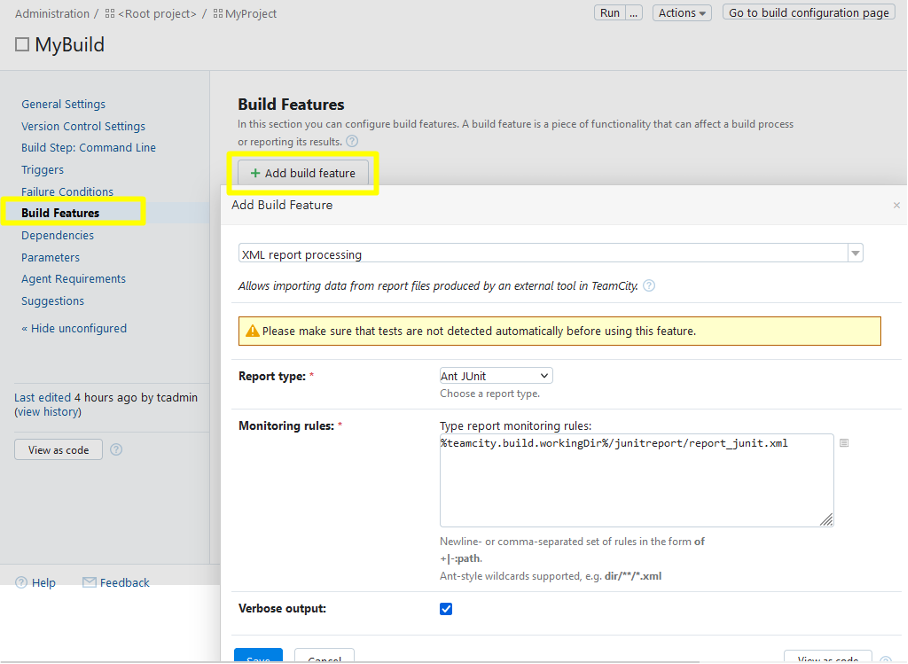
Within TeamCity we need to
- switch to the “Build Features” area
- add a new build feature
- choose the “XML report processing” with report type “Ant Junit”
- create a Monitoring rule
%teamcity.build.workingDir%/junitreport/report_junit.xml, which is where the JUnit report is created by QF-Test as defined in the command line build step - check “Verbose output” (optional)
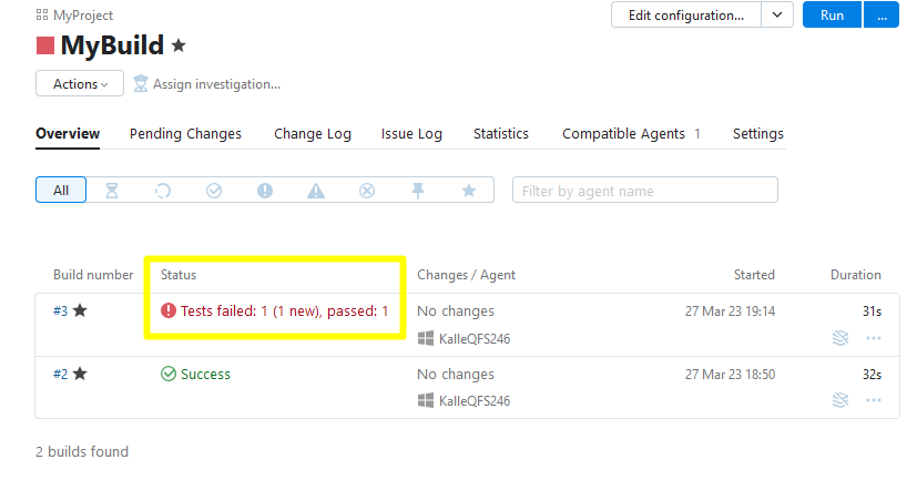
Saving and then triggering another run on the build configuration page gets us a much more detailed result. Notice that there was one passed and one failed test in our run, which is expected for the sample suite I used.
So far, so good. But one important feature is still missing. For test result analysis QF-Test provides run logs that should be available from within TeamCity, as well as the QF-Test HTML Reports that serve as a great overview.
Step 3: Run log and HTML Custom Report Integration
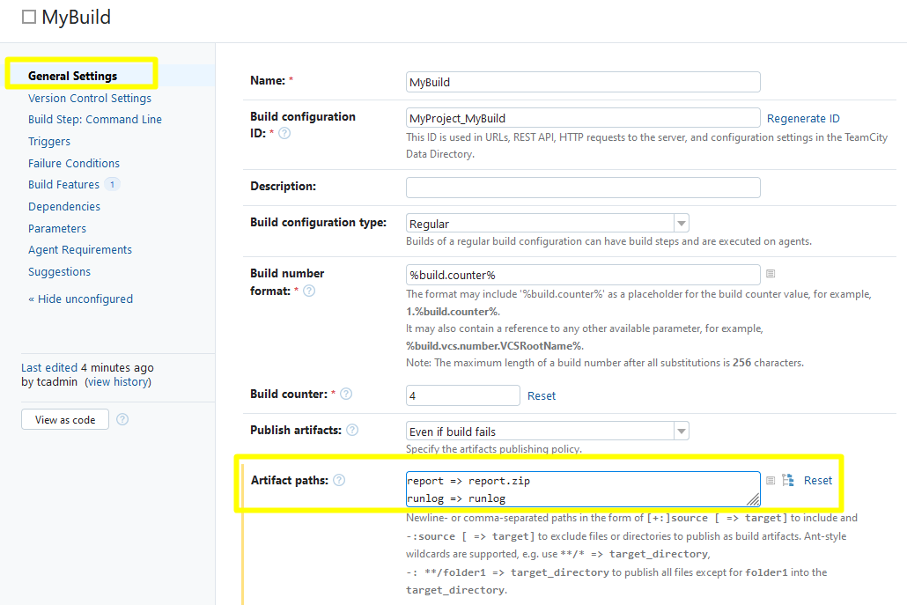
First, both the run logs and HTML report need to be defined as build artifacts so they are stored by TeamCity.
This can be done in the “General Settings” area:
report => report.zip: The report directory will be zipped up and storedrunlog => runlogTherunlogdirectory will also get stored. Since.qrzrun logs are already compressed, an additional zip step would not make sense.
Reminder: Run logs provide detailed information about the test run. HTML reports provide an overview.
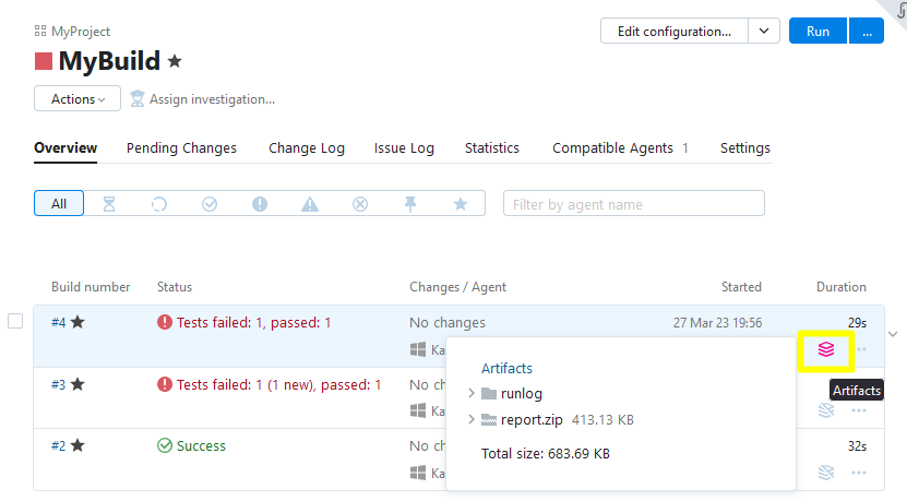
Triggering another run will deliver us the respective artifacts, containing the runlog directory and report.zip, ready for downloading.
Now, only one final integration detail remains: displaying the QF-Test HTML report in a separate build tab.
To do this:
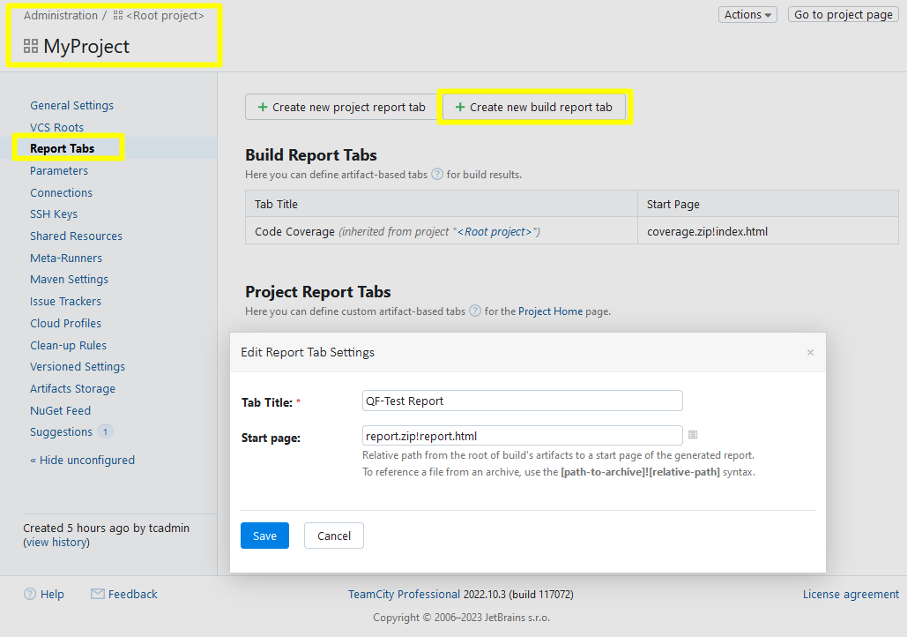
- navigate to the administration page of your project
- and from there to the “Report Tabs” page
- to “Create a new build report tab”
- with the title “QF-Test Report”
- and a “Start page” of
report.zip!report.html, which leads to thereport.htmlpage inside thereport.zipbuild artifact.
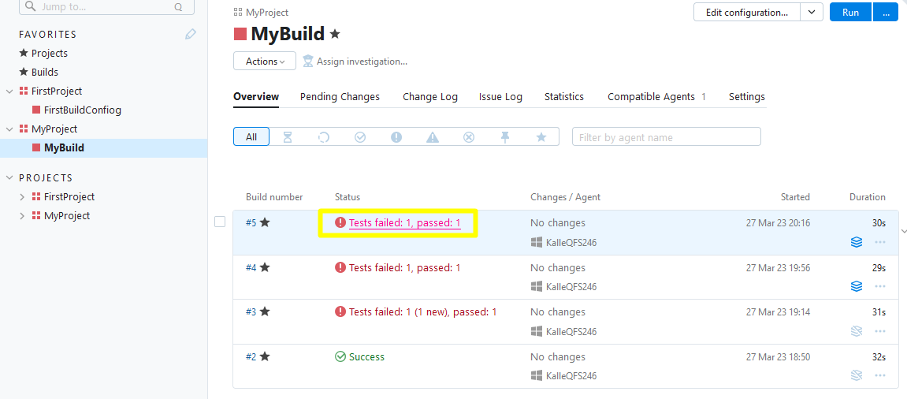
After heading back to the project and running another build, open the build details by clicking the link below “Status” …
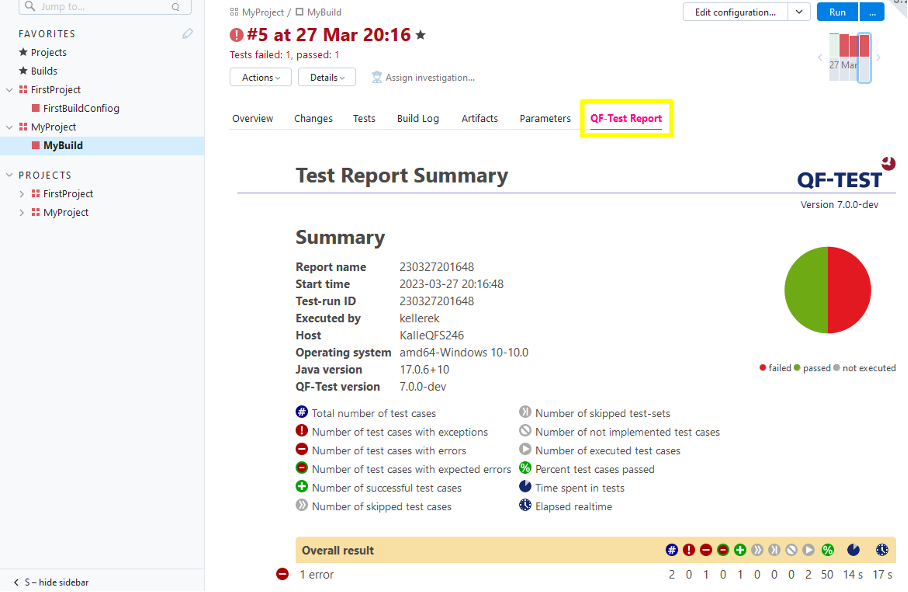
… and then the familiar QF-Test HTML report can be found right inside the new “QF-Test Report” tab.
This is just a first taste of the integrations possible between TeamCity and QF-Test.
You may want to take a look at the other QF-Test command line options documented in our reference manual. Especially the parameter -suitesfile <file> can be handy for customizing the test suites from outside the build step. Also, the TeamCity documentation includes even more advanced possibilities for integration, such as the concept of Service Messages, which communicate progress via standard output during test execution.
In case you have additional suggestions or questions about integrating QF-Test with TeamCity CI, feel free to let us know by contacting our support team.